Make AI Images Look More Realistic

Use Image to Realistic to reduce the obvious AI look and create a more natural, camera-like photo while preserving the subject, composition, and details you already like.
JPG, PNG, WebP · up to 20MB each · 5 credits per image0 images
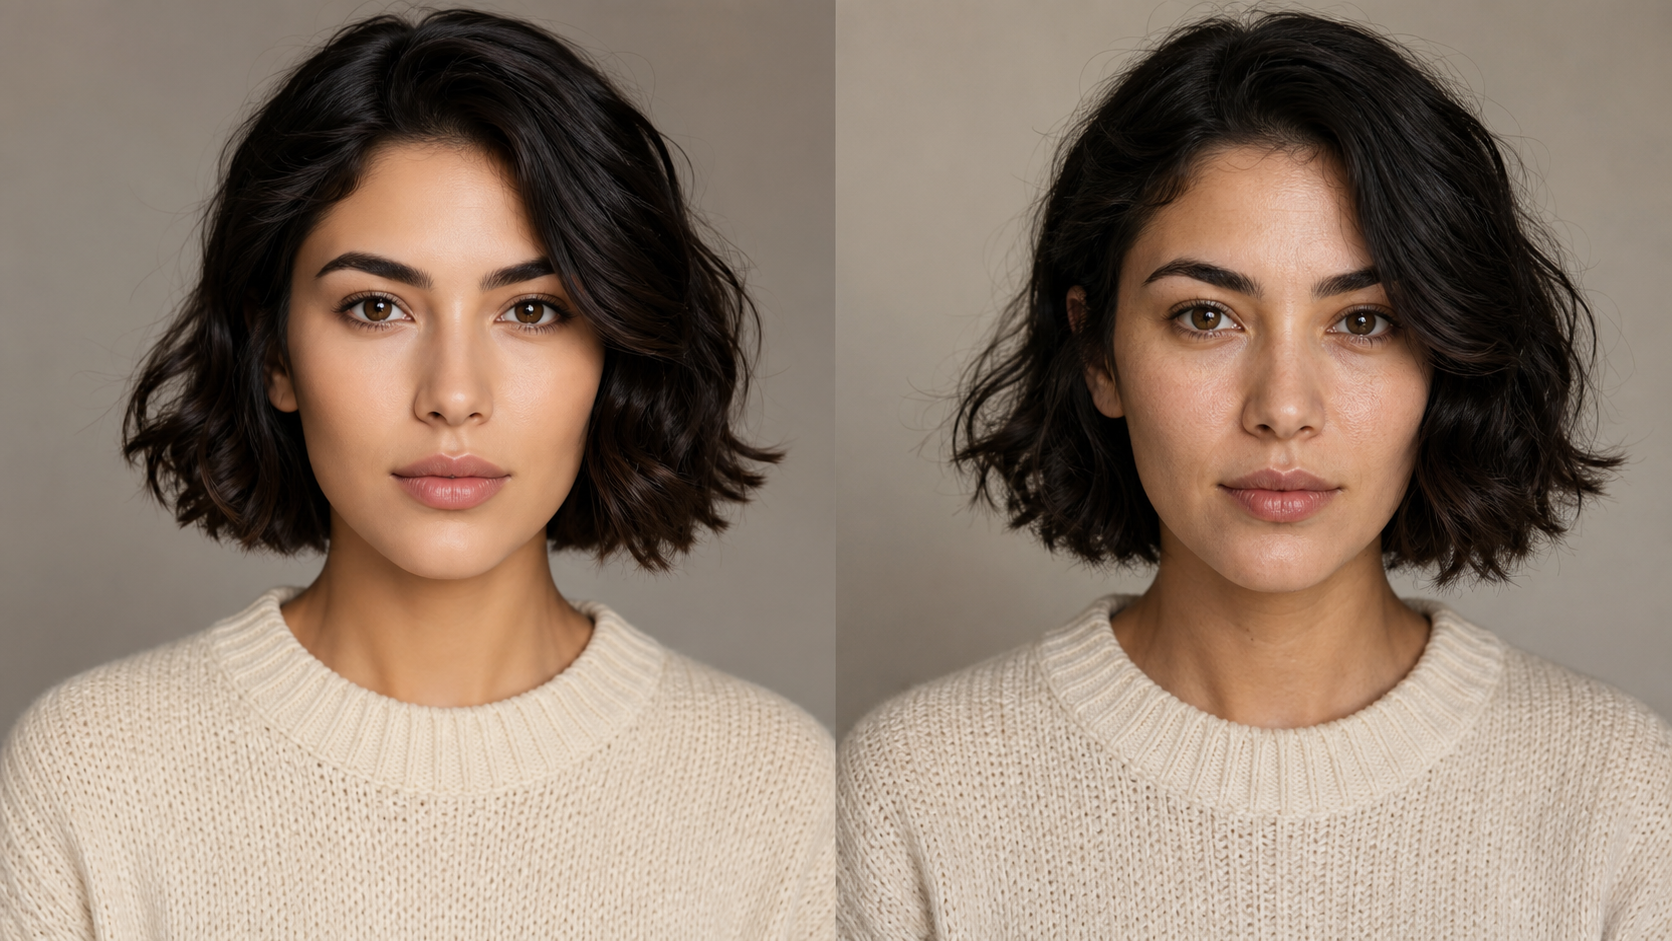
Preview of an AI image transformed into a realistic photoBefore & afterSee how an AI image becomes more realisticNatural skin, believable light, grounded color, and real depth

AI image before and after

Remove the synthetic look—not the AI image you liked

A useful AI image often already has the right person, product, pose, or composition. The conversion focuses on the visual finish: replacing waxy surfaces, flat light, and render-like depth with details that feel captured by a real camera.

Before and after example showing an overly smooth AI portrait transformed into a natural realistic portraitBefore · AI smoothnessAfter · natural detail

Texture returns

Fine hair, pores, fabric weave, and surface variation replace the uniform smoothness common in AI-generated images.

Light gains depth

Highlights, shadows, reflections, and background falloff begin to describe a believable physical space.

Identity stays familiar

The subject, crop, expression, wardrobe, and original creative direction remain recognizable after conversion.

Why AI images still look generated

The AI look is a pattern of small visual clues

An image can be sharp, high resolution, and beautifully composed while still feeling artificial. Viewers notice when texture, light, materials, and focus do not behave like they would in a real photograph.

AI generators are very good at creating the idea of a photo, but they often simplify the physical evidence behind it. Skin may be perfectly smooth, every object may be equally sharp, or a glossy material may reflect light in a way that does not match the room.

Making an AI image look more realistic is therefore not the same as adding grain or increasing sharpness. The whole image needs a consistent photographic logic, from the largest shadow to the smallest strand of hair.

Skin looks waxy or airbrushed

Generated faces often use one smooth texture across the forehead, cheeks, lips, and neck. Real skin changes by area and reacts differently to direct light, shadow, moisture, and focus.

Lighting is too even

AI images frequently expose every part of the scene equally. Real photos contain falloff, blocked shadows, bright reflections, mixed color temperatures, and areas the camera cannot record perfectly.

Materials lack physical behavior

Leather, glass, metal, fabric, hair, and painted surfaces should not share the same shine. Their texture, reflection, edge softness, and response to light are what make objects feel tangible.

Everything is equally perfect

When every strand, leaf, wall, and background object has the same crispness and polish, the image feels synthesized. Camera focus and real environments create a natural hierarchy of detail.

Built for believable detail

What makes an AI image look more realistic?

A convincing photo is a stack of coherent signals. Image to Realistic works across texture, illumination, color, focus, materials, and imperfection together instead of applying one aggressive enhancement filter.

Natural skin and surfaces

Bring back pores, fine hair, fabric weave, wood grain, and small surface variations. These details help a face or object feel physically present instead of airbrushed, painted, or molded from plastic.

Light that behaves naturally

Replace flat, even illumination with believable highlight rolloff, contact shadows, reflected light, and environmental color. Every part of the frame should feel lit by the same scene.

Real camera character

Introduce restrained depth of field, lens softness, natural focus transitions, and a credible tonal response. The result should resemble a camera capture without adding a heavy vintage or cinematic filter.

Details that stay in focus

Keep faces, product edges, clothing, logos, and composition recognizable while making the finish more lifelike. Realism should support the original idea rather than replace it with a different scene.

Grounded color science

Reduce synthetic saturation, clipped highlights, and plastic contrast. More believable white balance and color variation help skin, skies, fabrics, plants, and interiors feel captured rather than rendered.

Controlled imperfections

Add the restrained variation reality needs: a loose hair, an uneven reflection, subtle fabric movement, or a slightly imperfect surface. Random noise and fake film damage are not substitutes for realism.

A focused AI realism conversion

What changes—and what the converter tries to preserve

The goal is not to generate an unrelated replacement. It is to keep the useful content of your AI image while rebuilding the parts that reveal a synthetic render.

Realism changes

Visual cues that make the image feel artificial

These are the areas a realism conversion is intended to reinterpret so the frame behaves more like a photograph.
  • Waxy skin, clumped hair, and overly smooth surfaces
  • Flat illumination, weak contact shadows, and fake reflections
  • Synthetic saturation, uniform contrast, and sterile white balance
  • Render-like depth, edge sharpness, and repeated background detail
Source details preserved

The idea and composition you want to keep

Preservation keeps the realistic result connected to the source rather than turning every conversion into a new image.
  • The recognizable person, product, building, or main subject
  • The original framing, camera angle, pose, and visual hierarchy
  • Important clothing, object shapes, colors, and scene relationships
  • The creative direction that made the source image worth keeping

Generative conversion can still introduce variation. Review faces, text, logos, product geometry, architecture, and other sensitive details before using the result in paid campaigns or client work.

Bring the AI image you already have

Make images from popular AI generators look more real

You do not need the original generation prompt or model settings. The converter works from the visible pixels in your source image, which makes it useful for older generations, downloaded concepts, and images created in a different AI workflow.

MidjourneyDALL·EStable DiffusionFLUXAdobe FireflyAI portraitsAI product rendersAI interiors

Start with the highest-resolution version available. Clear facial features, consistent object shapes, and a composition you already like give the realism process more useful information.

Generator names are listed only to describe common source images; no affiliation or model-specific metadata is required.

Practical AI image workflows

When to make an AI image more realistic

Use an image to realistic converter when the concept is strong but synthetic details reduce trust, distract from the subject, or make the final visual feel unfinished.

AI portraits and headshots

Turn a polished but artificial AI face into a more natural portrait. Improve pores, hair separation, eye reflections, facial highlights, and background depth while keeping the person, expression, pose, and framing familiar.

AI product photography

Make generated product concepts feel photographed instead of rendered. More convincing materials, reflections, contact shadows, and studio-light falloff help packaging, furniture, fashion, and consumer products look tangible.

Interiors and architecture

Reduce the sterile CGI finish in AI interiors, property concepts, and architectural visualizations. Add surface variation, natural window light, realistic scale cues, and atmospheric depth without redesigning the space.

Social and campaign images

Prepare AI-generated lifestyle scenes, ads, thumbnails, and editorial concepts for contexts where obvious synthetic polish distracts from the message. Keep the composition while giving the image a more credible photographic finish.

Simple by design

How to make an AI image look realistic in 3 steps

No masking, layers, or complex prompt engineering. Add the AI image you want to keep, convert the artificial finish, and review the new photographic details.

01

Upload your AI image

Add one or more AI-generated images in JPG, PNG, or WebP format. Use the clearest version available so faces, objects, materials, and edges provide useful visual information.
02

Convert the artificial look

Start the conversion. The realism process targets synthetic texture, flat light, unnatural color, weak depth, and other visual cues that make an AI image look generated.
03

Review and download

Compare the realistic version with the source. Check identity, product shape, composition, and important details, then download the result that best preserves your original idea.

Image to realistic FAQ

Questions about making AI images look real

Learn what the converter changes, which AI-generated images it supports, what it tries to preserve, and what a more realistic result actually means.

Realism without the editing marathon

Make your AI image feel photographed, not generated

Keep the subject and composition you already like while replacing plastic texture, flat light, synthetic color, and render-like depth with a more believable photographic finish.